Serverless Functions Explained: Setting Up for Local Development and Testing


In Part 1 of this article, Serverless Functions Explained: Fundamentals, we talked about serverless architecture and functions. Now, we are ready to apply the knowledge we gathered. Part two aims to demonstrate how we can run a local environment to develop and test our serverless functions, using a simple application as an example.
We will go through:
- Application Description
- Local Environment
- How it works?
- Time to execute
Application Description
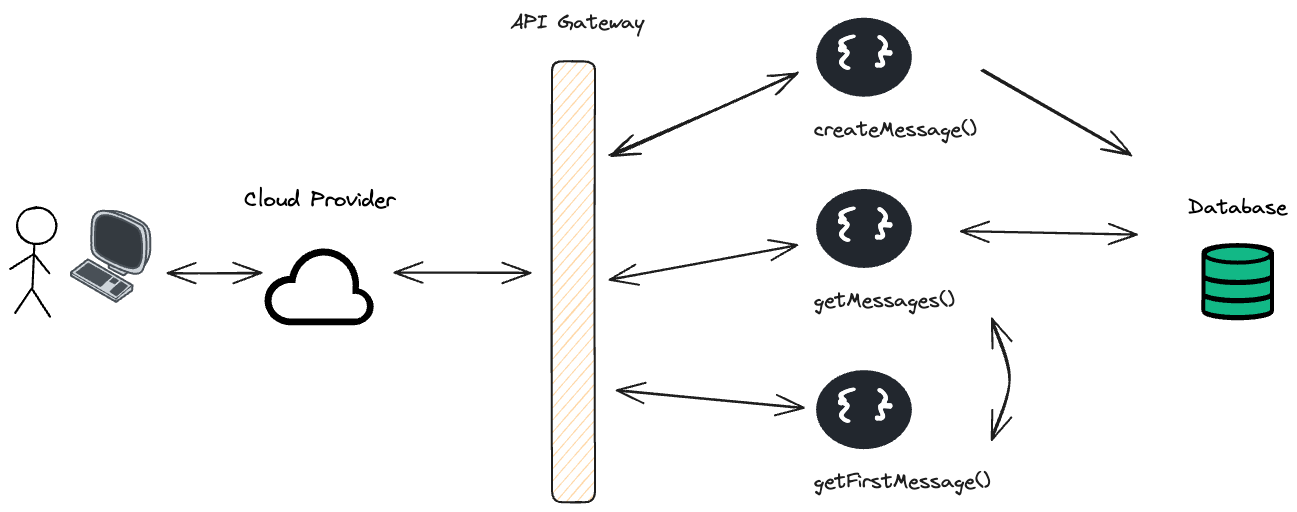
The serverless application we will build has three features: to create and save a message into a database, to get all messages, and get the first message from the database. In other words, we are going to have three functions.
Each function will be triggered by an HTTP request. For example, the "getFirstMessage" function will invoke the "getMessages" one, returning only the first. Finally, each HTTP request should go through an API Gateway, redirecting each request to the right serverless function. Let's check the following image to better understand the application.
Now that we know what the application should do, we need to choose a cloud provider and decide which of its services we need to use. For this example, we aren't going to deploy the application to the cloud, the goal is to create a local environment like the one in the cloud provider.
Let's use AWS as the cloud provider. AWS offers a service named AWS Lambdas, which allows the developer to upload his functions (lambdas). We can use AWS DynamoDB, a NoSQL database, and finally, for the API gateway, we can use AWS API Gateway (yeah... no fancy name for this one).

Great! We've defined what to build, let's explore the tools we'll use to create the local environment and run these serverless functions.
Local Environment
In the article, Serverless Functions Explained: Fundamentals, we mentioned techniques to help us develop serverless applications locally. One of these techniques was emulation, which enables us to create a local environment that mimics the cloud environment as closely as possible. Since the purpose of this article is to create a local environment for developing and test serverless applications using multiple cloud services, emulation will be the only technique we'll use.
To emulate the AWS services, we will use LocalStack. This tool can emulate numerous AWS services under its free tier, including the specific services required for this application.
With the emulation tool chosen, we still need something to define and configure our serverless application, including specifying which functions to deploy and the services we will need. The Serverless Framework is an open-source tool that helps us build and deploy cloud applications. With a YAML file, we can define and configure our desired setup. Additionally, we will use the serverless-localstack plugin, which integrates the Serverless Framework with LocalStack. This plugin allows developers to deploy and test AWS services locally without an internet connection, avoiding potential costs.
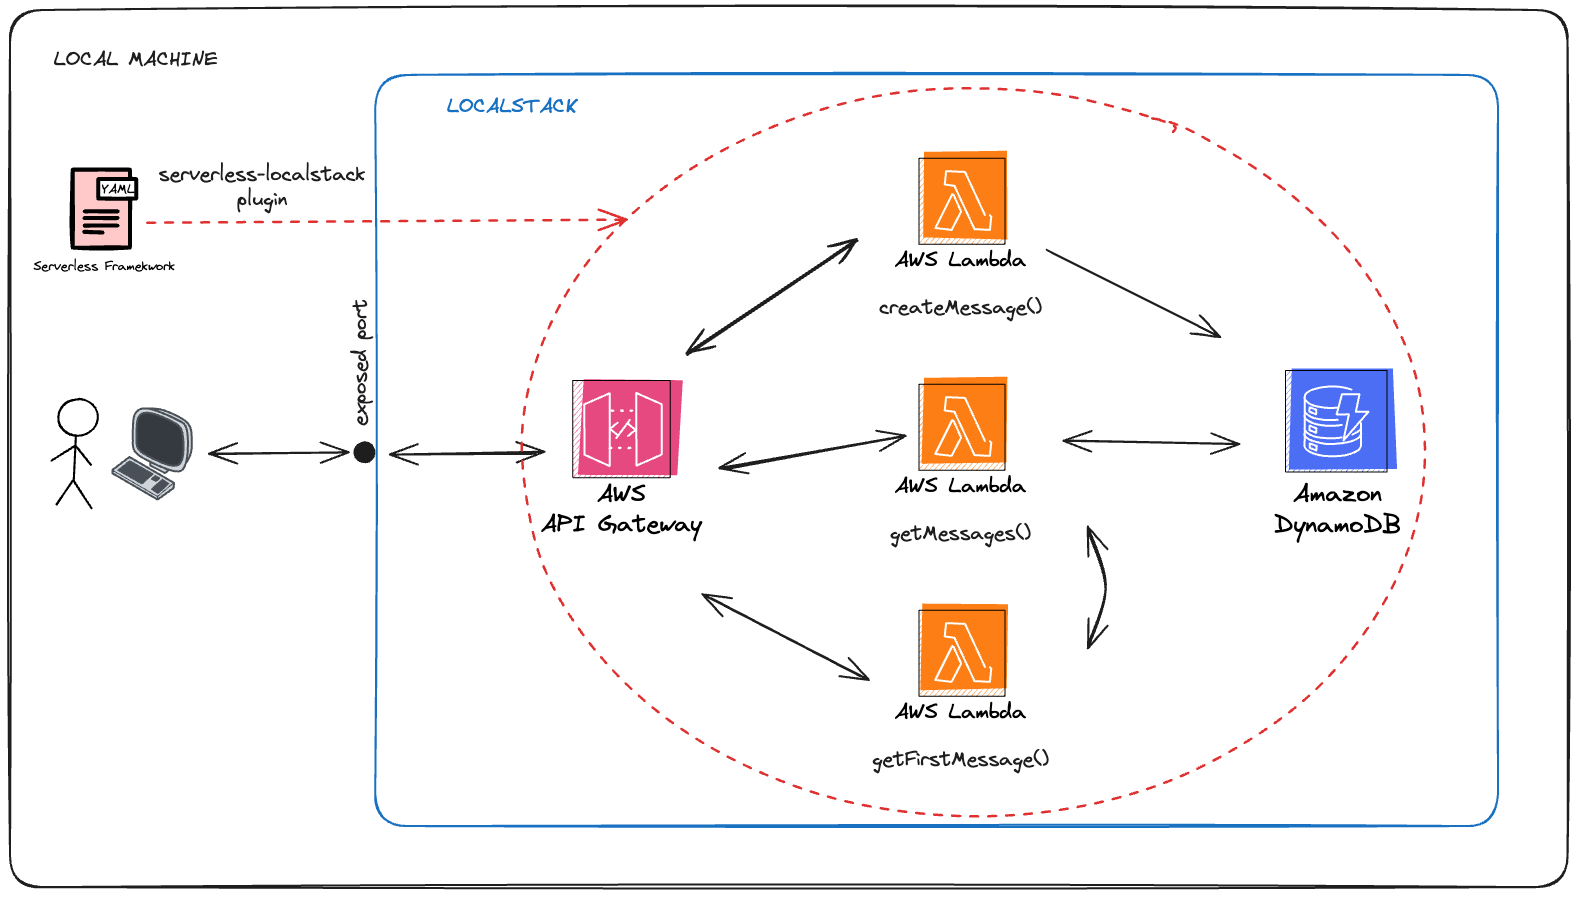
Additionally, we’ll need Docker and Docker Compose to run a LocalStack container, and Node.js (version 20.x or higher) to install our dependencies and compile our functions. The functions code won’t be shown in the article, but if you want to follow along, you can clone the repository.
How it works?
Localstack
First, we need to have LocalStack running on our machine. We could either install LocalStack CLI or run a LocalStack docker image. In this example, we'll run it using a Docker image.
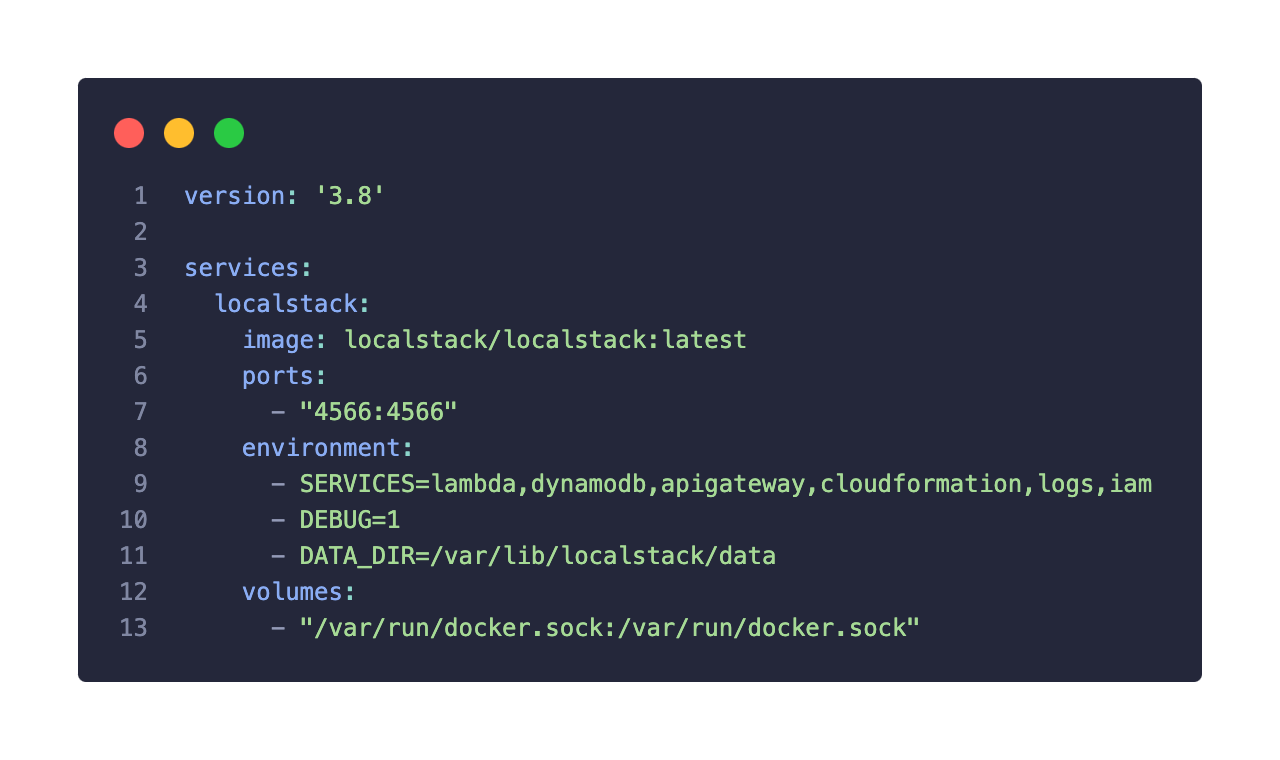
In this docker-compose YAML file, we are configuring a single service named "localstack" with its latest image available. The exposed port 4566, serves as the entry point to interact with LocalStack container. The volume configuration mounts the Docker socket from the host into the container. This setup is essential for LocalStack to manage Docker containers to execute Lambda functions. In other words, it allows LocalStack to start a container to run a function.
Regarding the services environment variable, this defines which services LocalStack will emulate. The Lambda, DynamoDB, and API Gateway are expected, as we need those to achieve our application architecture. The other three services are required by the Serverless Framework during the deployment.
The "logs" service corresponds to the AWS CloudWatch Log service, which is required because, when deploying Lambda functions, each Lambda is associated with a CloudWatch Log Group. This log group captures the output of the Lambda function, which is crucial for debugging and monitoring. By default, Serverless Framework creates a log group for each Lambda function we deploy.
AWS Identity and Access Management (IAM) service is necessary for Lambda functions and other AWS services to operate correctly. The Serverless Framework automatically creates these IAM roles and policies during the deployment process. For example, we have to configure an IAM role to write and read from our DynamoDB table.
Finally, the Serverless Framework translates our serverless.yaml configuration into a CloudFormation template. This template describes the infrastructure and resources (e.g., Lambda functions, API Gateway endpoints, DynamoDB tables) needed to be created, updated, or deleted. Therefore, Serverless Framework won't be able to deploy and manage anything without this service.
Serverless Framework
With the Serverless Framework, we need to deploy our Lambda functions, DynamoDB table, and configure the endpoints for the API Gateway to LocalStack. Let's look at how we can do this with a serverless.yaml file.
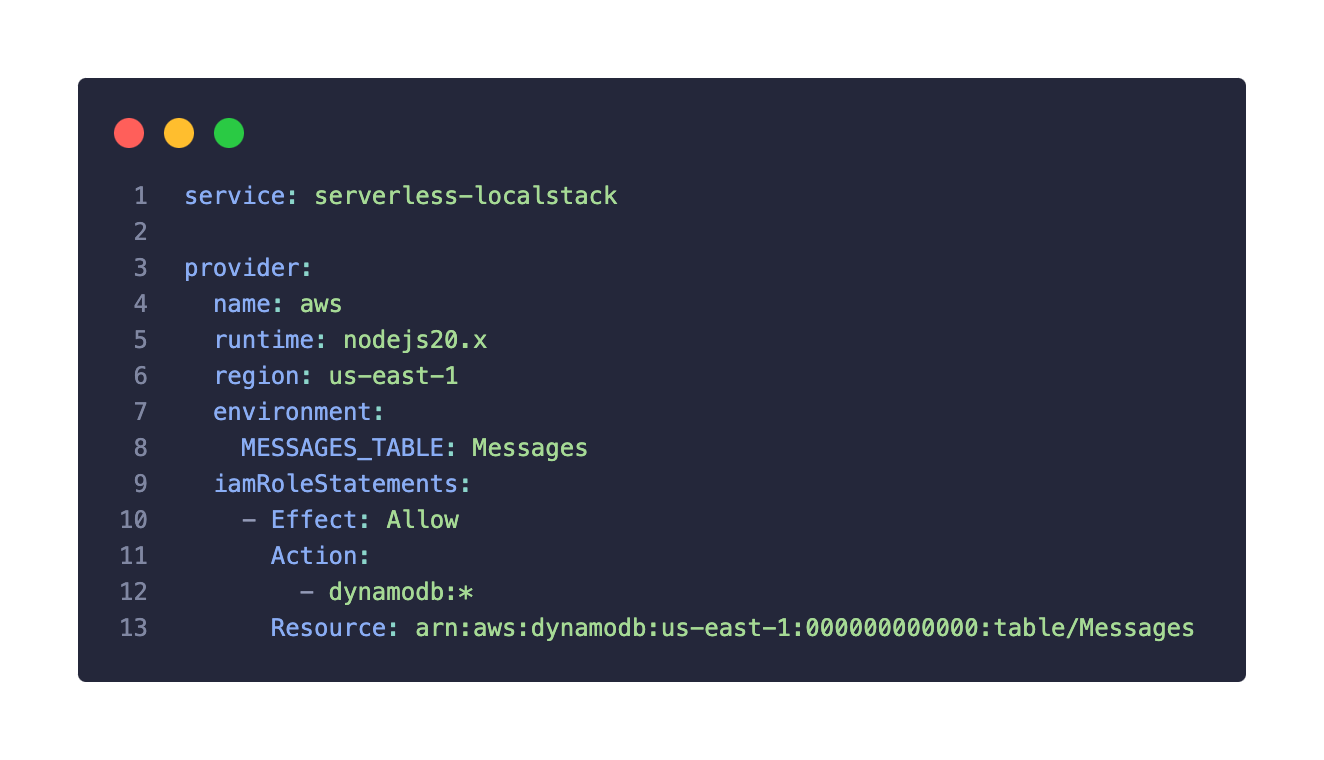
We start by defining a service name, used to group all functions, resources, and configurations associated with this service. Then, we need to describe our provider, which corresponds to the cloud provider we are developing for, in this case, AWS. The environment variable set at the provider level holds the table name we'll use, making it accessible to every function. The same goes for the IAM role statement, where each function will have all permissions to interact with the `Messages` table. Each function can have its own custom environment variables and IAM roles, but, for simplicity purposes, defining them at the provider level will do the trick.
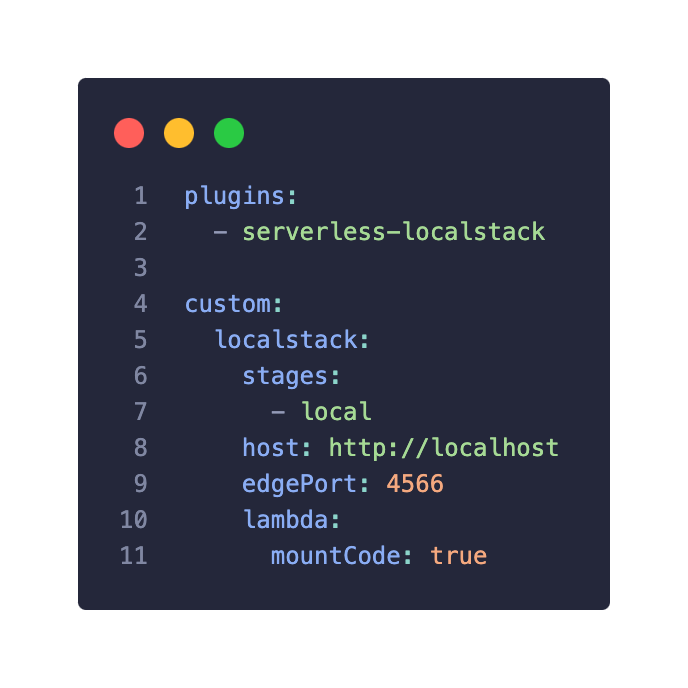
Next, we extend Serverless Framework features by adding the serverless-localstack plugin, allowing us to deploy our resources into the running LocalStack environment. In the custom section, we add custom variables and configurations used by plugins. In this case, we add a custom configuration for the localstack service corresponding to the serverless-localstack plugin. Here, we specify which stage should interact with LocalStack, the host URL, and the corresponding service port, and we enable live code reloading for Lambda functions.
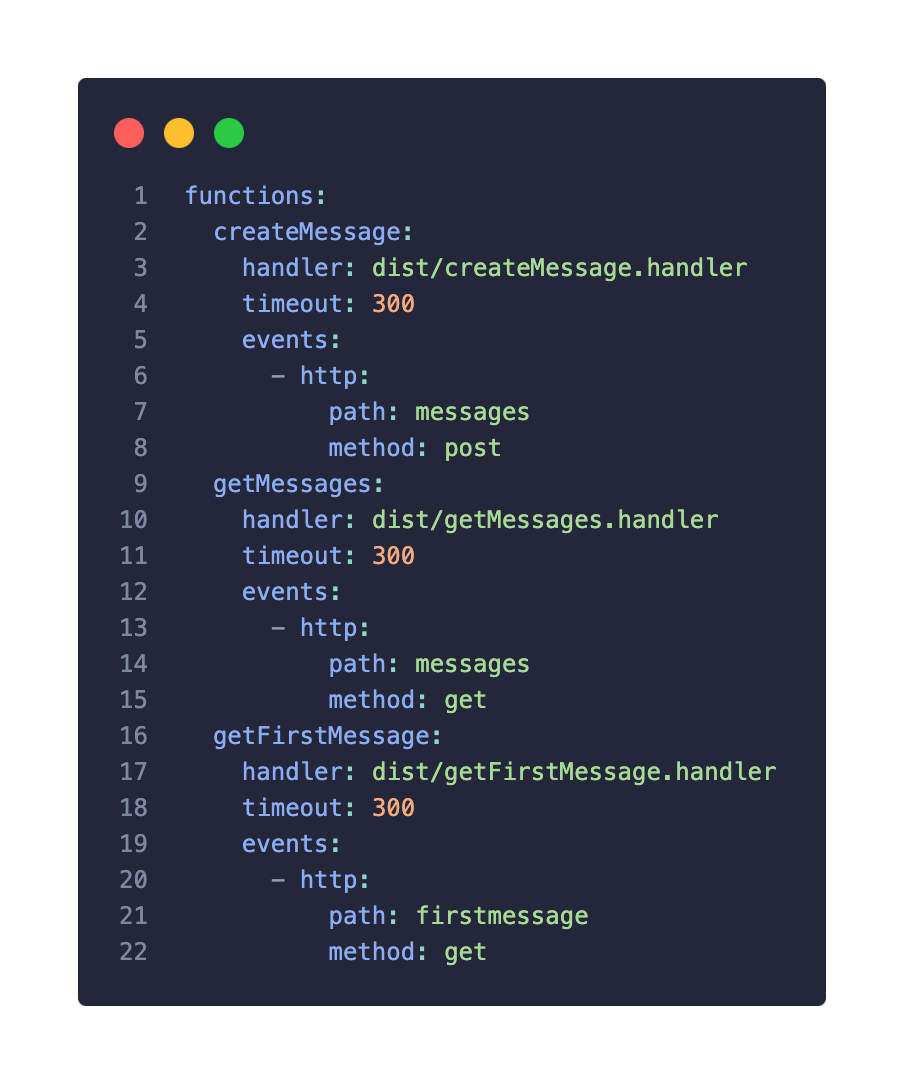
In the functions section, we define the location and endpoints of our functions. This way, when an HTTP request hits the API Gateway, it will invoke the correct function. We also set an execution time of 5 minutes to ensure the function doesn't run indefinitely. These functions were developed and compiled using Typescript, but you could use different programming languages.
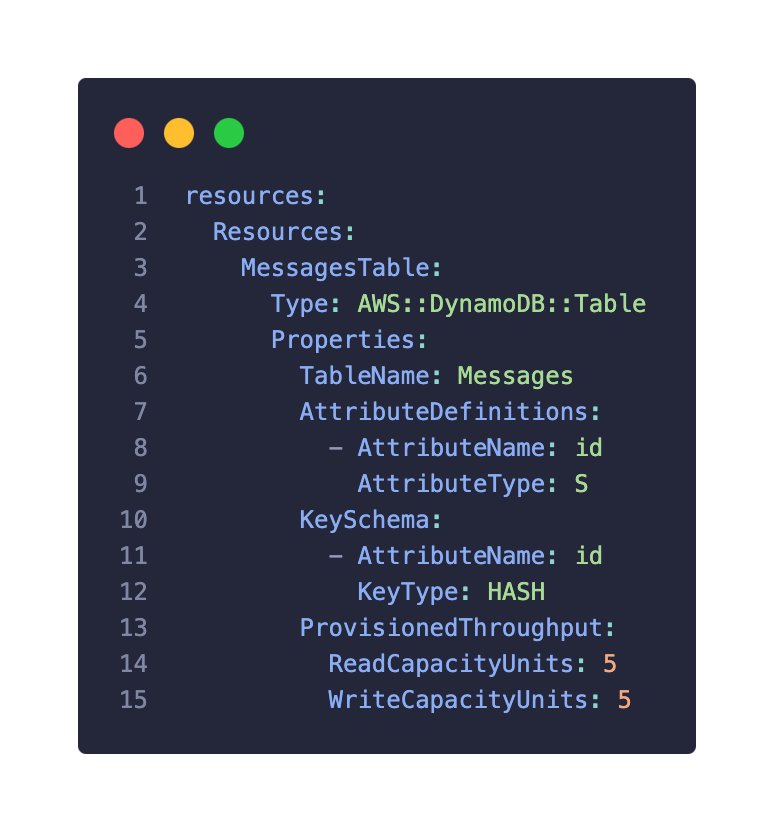
Finally, the last section on the serverless.yaml is the DynamoDB table resource. Here, we define the Messages table with one primary key attribute. We also set a limit for the read/write capacity per second. Although we only set one attribute on the table, we can add more attributes within the functions since DynamoDB is a schema-less database and allows for flexible and dynamic addition of attributes to items as needed.
Time to Execute
Once we execute the:
docker-compose upLocalStack will start emulating the specified AWS services, but no resources will be created until we deploy our application using the Serverless Framework. To achieve that, on the same directory as serverless.yaml, we simply run the command:
serverless deploy –stage local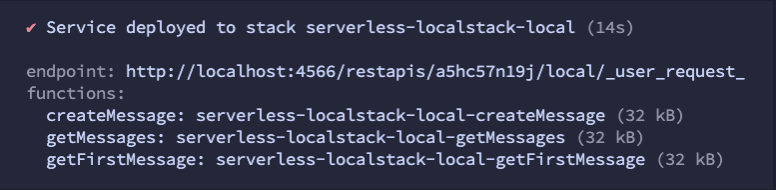
With the deployment successfully done, we can confirm that LocalStack has configured the API Gateway, with the unique identifier a5hc57n19j, to serve our deployed functions. Additionally, we can confirm the three functions have been deployed.
Let's test it by calling the create message function using the provided endpoint and adding the path defined on serverless.yaml:
curl -X POST http://localhost:4566/restapis/a5hc57n19j/local/_user_request_/messages -H "Content-Type: application/json" -d '{"message": "Hello, LocalStack!"}'Output:
{"id":"8671b2b9-81ce-4349-b813-b1e35e671e4b","message":"Hello, LocalStack!","createdAt":"2024-06-13T13:17:18.141Z"}The output confirms that the function had permission to access and write to the Messages table. Let's try the getFirstMessage function, which will invoke the getMessages function:
curl http://localhost:4566/restapis/a5hc57n19j/local/_user_request_/firstmessageOutput:
{"message":"Hello, LocalStack!","createdAt":"2024-06-13T13:17:18.141Z","id":"8671b2b9-81ce-4349-b813-b1e35e671e4b"}It's working! We could also call getMessagesFunction directly, but to keep it simple and because we only have one message saved in the database, we won't do that.
Wrapping Up
By following this guide:
- We successfully set up a local environment for developing and testing serverless functions by emulating AWS services using LocalStack.
- We utilized the Serverless Framework to define and configure our infrastructure and resources through a YAML file.
- We deployed our infrastructure and resources to the LocalStack environment, with the help of the serverless-localstack plugin.
- We invoked the functions by HTTP requests to the endpoints configured in the API Gateway.
This setup demonstrates how teams can benefit from using local environments to develop serverless applications. By emulating cloud services locally, teams can simplify the development process, reduce costs associated with using actual cloud resources, and improve testing accuracy. Additionally, it allows for faster iteration and debugging, enabling developers to work more efficiently without relying on a live cloud environment.